Showing posts with label Whipped Cream. Show all posts

Wednesday, June 25, 2014

Fluffiest Frosting


This frosting is reminiscent of clouds. It's SO LIGHT AND FLUFFY! And bakers beware, if you are only making a single layer cake, like in a 9x9 inch pan...and you make an WHOLE batch of this frosting, one of two things are going to happen: 1) you have a good bit of frosting hanging out in your fridge when you are finished frosting your cake or 2) you will have a cake heaping with fluffy frosting.
Guess which outcome I choose. My cake was half of this frosting by volume. I figured, why not? Saying it was a bit much is an understatement, but it was good for a few laughs when cutting into it and seeing the surprise on people's faces when they realized half of their slice was frosting.

I really liked this frosting, it has a really mild flavor and isn't too sweet; making it a perfect base for so many flavor opportunities! You can add spices and extracts to match any flavor profile you are working with, and adjust the sweetness to suit your taste.

The heavy cream is what makes this frosting so light and airy, it is whipped (along with the other ingredients) much like you would do to make your own whipped cream. The ingredients don't seem like they will make so much frosting at first, but after all the air is incorporated, the mixture will double in size.

This is definitely one of the more interesting frostings I have made, even though this version's flavor was plain, the texture was unique. Could you imagine adding some cocoa powder? Chocolate-y clouds of frosting. Yum!
Oh, and I bet you could use full fat coconut milk instead of the whipping cream and maybe even Cashew Cream Cheese for a vegan version. Ohhh.. cocoa and coconut!... pure decadence. Okay, I have to stop now before I bake another cake. Here's the recipe.

Ingredients:
8 oz plain cream cheese
1/2 cup granulated sugar (more or less depending on tastes)
2 t vanilla extract
2 cups heavy whipping cream

Combine the cream cheese, sugar, and vanilla until smooth.
Add the cream (I slowly added it in three batches), using a mixer, start mixing at a lower speed and work your way up until the frosting resembles whipped cream and stiff peaks form.

Recipe adapted from here.

What's your favorite cake-frosting flavor combo?

I have always LOVED banana cake with cream cheese frosting. In fact, a banana cake is what this recipe was tested out on, and that recipe will be up on this blog soon, so report back for that update!

Cheers,
     Suzy


Thursday, June 5, 2014

Blueberry Buckles and other Fruity Things

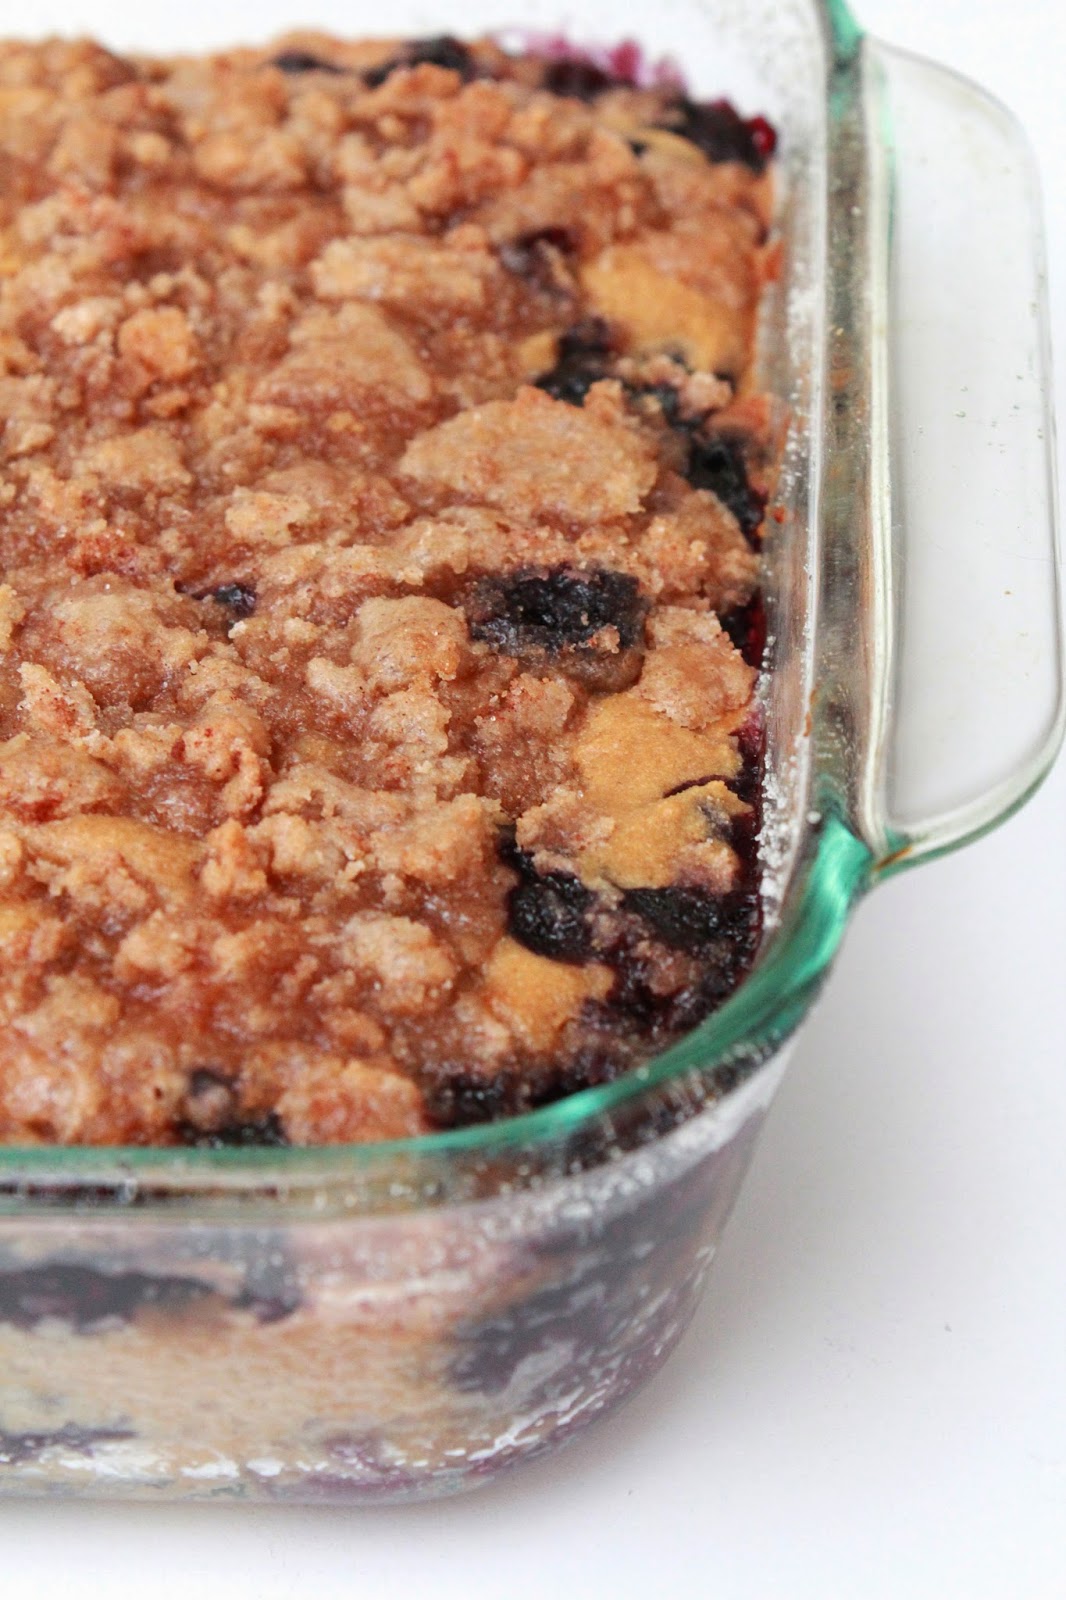
Something I have realized over my casual culinary career, that never ceases to surprise me, is how good fresh fruit and brown sugar taste together.  If a recipe calls for those two things it probably won't be bad. I love baking fruity desserts, and I was surprised when I realized how few (read: zero) I had on this blog. BUT this is about to change my friends because, this Blueberry Buckle encompasses both fresh fruit and brown sugar, and it tastes amazing (I already tested it for you,  no guess work on this recipe!).

A buckle  is similar to coffee cake with fruit baked in the cake batter and topped with a sugar-y cinnamon-y topping. After the buckle is baked, the cake can be seen through cracks made by the topping, and it looks as though the entire cake itself had buckled. This is one theory behind why this delicious dessert is called a buckle, but whatever you call it, I'd eat it.
 I served this dessert along side freshly whipped cream and a Bursting Blueberry Compote, because more blueberries is never a bad thing. Serve this to some favorite company on a temperate summer evening, and I can guarantee you will have a good afternoon in the making.

Blueberry Buckle

Yeild: 1 9x9 inch dish (~9 portions)
Cake:
1/2 cup sugar
1/4 cup brown sugar
1/4 cup butter of choice (I use a yogurt butter from a tub)
1 large egg (or egg substitute)
1/2 cup milk of choice
1/4 cup Plain Greek yogurt (or sour cream)
2 cups GF flour blend:
       1/2 cup tapioca starch*
       1/2 cup brown rice flour*
       1 cup sorghum
       (optional) 1 t xanthan gum
2 t baking powder
1/2 t salt
2 cups blueberries (both fresh and frozen work, you could even try raspberries or your favorite fruit!)

Topping:
1/3 cup sugar
1/4 cup brown sugar
1/3 cup GF flour (brown rice)
1 Tablespoon cinnamon
1/4 cup butter of choice

1. Preheat oven 375 degrees F, and butter (and sugar-coat) the edges of a 9x9 inch pan
2. For the Cake: cream the butter and sugars until fluffy. Add the egg, milk and yogurt and mix well.
3. Combine the flours and mix in the baking powder and salt. 
4. Incorporate the dry mix into the wet ingredients.
5. Gently fold in the blueberries.
6. Pour the batter into the prepared pan.
7. Combine all the topping ingredients and evenly distribute by crumbling it between your fingers ontop of the cake batter.
8. Bake for 35 minutes until golden brown, and a toothpick comes out clean.

This is wonderful served either warm or cold.
I served it at room temp with this freshly whipped cream and this Bursting Blueberry Compote, delish!
BUT, if I were to serve it warm from the oven, I think vanilla ice cream would be a great accompaniment.

*Notes: next time I think I would like to use arrowroot starch in place of the tapioca and oatmeal flour in place of the brown rice, just because I like these two ingredients (personal preference) and I tend to have these more readily on-hand. But I can't attest to the results because I haven't make it yet...hmmm, is that an excuse I now have to make this again? :)
And a blueberry lemon/orange version of a buckle might be nice, by adding a teaspoon of zest to the cake batter before baking!

Cheers,
      Suzy


Friday, May 17, 2013

Cashew 'Cream Cheese'

I would have never thought of soaking and blending cashews to make a vegan cream cheese, but I'm glad someone did, because it is a satisfying replacement. And it is a very handy recipe to have in your back pocket if you don't have cream cheese, because who doesn't have cashews lying around for emergencies? Okay, so I went to the store and got cashews specifically for this recipe, but who could pass up an occasion to make vegan cream cheese? Not me!
Could I have just as easily bought cream cheese? Yes, but we don't need to make things any easier than they are...this is the 21st century, and we have and app for that.
Homemade things are more fun, and it is nice to be able to appreciate something so simple...slowly. One step at a time.
And appreciate this Cashew Cream Cheese I have, after patiently waiting for the cashews to soak and after thoroughly blending them in a blender until silky smooth, it has been a delightful accompaniment to toast and veggies! Ahh, the simple things.
Not to mention the added health benefits of cashew cream cheese, healthy fats and antioxidants. Makes for happy snacking!

Healthy fats: Cashews, among other nuts are filled with healthy unsaturated fatty acids. These are the fats that actually help your cholesterol levels rather than harm them like the saturated and trans fats. The unsaturated fats are what help your hair shine and your skin glow. We need them like any other macro- and micro-nutrients!
Antioxidants: These little nuts are high in antioxidants  a free-radical fighting molecule that inhibits the oxidation and damage to other cells and molecules.
Copper: Plays an important aspect of enzymes that helps them to carry out the roles they were meant to do.
Magnesium: Cashews are known for containing magnesium. Magnesium helps to keep our bones strong and our muscles and nerves relaxed. Two important, very different functions. A little nutty isn't it?

So, lets get to it!

Adapted from: Oh. Ladycakes's Raw Cashew Cream

Cashew Cream Cheese spread on some simple GF toast

Cashew Cream Cheese

1 1/2 C raw cashews
3 medjool dates, pitted
1/2 C almond milk
1/4 C water
1/2 t lemon juice*
1 T agave*
splash of vanilla extract, depending on desired taste*

Cover raw cashews with water and allow to soak for at least 4 hours, or overnight. I will rinse the water once or twice while they are soaking. Before the cashews are done soaking, allow the dates to soften for at least 30 minutes, adding them to the cashews.
Drain the water the cashews and dates are in, and add them to a powerful blender or food processor. Add the almond milk, water, lemon juice, and vanilla extract.

*All added flavors depend on desired taste, sometimes I would like it more sweet and will add more dates or more agave or even honey.

NOTE: I recently just made this and added a pinch of xanthan gum so that it would keep its form and hold up in a recipe better. It worked very well.

Cheers,
     Suzy

Monday, April 1, 2013

Banoffee Pie

I had the pleasure of making this pie and being able to share it with my grandparents. Following a lovely lunch, this was a really great way to end the meal. Sometimes you just need to make a tried-and-true, old-fashioned pie.
Well, it wasn't my tried-and-true per say, I had never made a Banoffee pie before. BUT, I went crazy researching recipes and comments for making Banoffee pie, until I was confident I had a no-fail recipe.

I had taken an interest in making one after reading another blogger's post about it's origins. 
I had always thought Banoffe pie had to do with coffee and bananas...but I was mistaken, it's toffee and banana! This is a brilliant combination and is a really nice change from chocolate-overload desserts that I am usually drawn to. Of course, chocolate is still made it's appearance on the pie, but only a little... as decoration. The bit of bitterness the dark chocolate lent the pie, did complement the super sweet bananas and toffee wonderfully.

This is a classic English dessert that I look forward to making again! It was a breeze to put together and the result is a grand presentation. 
What really won me over was the texture. The soft bananas and toffee pair really well with the chewy graham cracker crust and fluffy whipped topping.

Now, I will admit...while I was making the pie I was a little concerned about how it would turn out. To me, a layer of toffee just didn't seem...how do I want to put this...appetizing? I thought the banana and toffee were mixed together as a filling before being put in the pie crust, instead of being layered separately like how the recipe called for. To make myself feel better, I did add a single layer of banana before pouring the toffee into the crust. There...that's better! Whew. I realize this isn't normal, but I liked it, and I don't think anyone would really notice...or care for that matter.

Banoffee Pie

adapted from maameemoomoo
yield: 1 10 inch pie

2 1/2 cup gluten free graham cracker, crushed
1/4 cup almond meal as needed
1 cup butter, melted
1 can condensed milk
5 bananas, divided
200 ml whipping cream
1/4 cup dark chocolate, melted

Fill a large pot with water and submerge the can of condensed milk in the water. Place the pot on the stove and bring to a boil. Continue to boil the water for 2 hours, adding more water as needed.
Remove the can and let cool completely.
I use the plastic baggie and rolling pin method for crushing graham crackers, I always end up with crumbs everywhere, If you prefer another method go for it.
Melt the butter, add the cracker crumbs and thoroughly mix. I thought my mixture was too wet still, so I added almost 1/4 cup of almond meal. Press mixture into the base and onto the sides of a 10 inch pie dish (I used a springform pan).
Chill for 1 hour.
Here is where I added one banana slice layer.
Open the can of condensed milk. Spread onto the base of your crust. Chill for 1 hour.
Peel and thinly slice the rest of the bananas, layer on top of the toffee layer.
Whip the cream for a few minutes on high (I used a hand-held blender), and spread this over the bananas.
Decorate with the melted dark chocolate.

This pie was also super easy to make gluten free. All you really need to do is buy gluten free graham crackers, which are now quite common to find in grocery stores. Of course if you are feeling really ambitious you could try to make your own graham crackers, but in this recipe I settled for store-bought.

Now, since making this recipe, I can say it is my tried-and-true, I look forward to making this again for another gathering.

What are some of your favorite flavor combinations?

I'm pretty sure banana and toffee will be making it's appearance in the kitchen much more frequently, and the chocolate...that will always be close at hand ;)

Cheers, 

     Suzy